
前言
为什么要自己实现一个表单设计器
网上找了很久没有发现比较好的,比较好用的基本都不开源,formilyjs配套的designable功能比较强大,用起来也不错。但是很可惜,已经不维护了。另外,designable设计的很复杂,改造成本很高,对于大多数项目而言很多是用不到的。并且designable和antd深度绑定了。其他前端组件库很难与其集成。所以,我们决定,自己实现一套,一次性解决问题。 designable 地址 https://github.com/alibaba/designable
由于designable 停止维护了,我们提供了designable的基于antd v5的修复版本,有需要的可以直接拿源码去构建使用。https://github.com/trionesdev/triones-designable
期望目标
我们希望可以实现一个轻量的,可以适配不同组件库的方案。可以让使用者,自由的选择使用什么组件库。并且可以跟进规范,自由的扩展组件功能。
技术方案
状态管理
react自带的context,mobx还是@formily/reactive 根据调研比较 formilyjs 基本可以满足我们在表单设计上的需求,并且支持react和vue,以及多种组件库的支持。@formily/reactive也满足对于数据同步的相关需求。
拖拽动作
是基于dnd这种drag事件 还是基于mouse动作进行精细处理?如果只是实现拖拽dnd方案就可以,比较简单,但是如果想要画出操作的辅助线,就只能基于mousemove来执行,因为drag事件的时候,是无法监听mousemove的。
辅助线
辅助线很多是在组件外包一层,这种方案实现最简单,但是用过组件库的大多都注意到FormItem 组件基本都会有marginBottom属性。如果用外层元素包裹的话,就会明显的感觉大小不一致。这个时候,我们通过获取元素的实际大小,绘制一个图形,作为辅助线,视觉效果就会好很多。
样式处理
为了解决不同组件库采用的样式方案可能不一样的问题,我们没有采用less或者sass这样的方案,而是选择了css-in-js的解决方案@emotion/styled
实现方案
鉴于designable的优秀设计,我们大量的借鉴了其设计思路。
整体布局
依旧采用了通用的左中右布局,左边是工具面板,中间是工作台,右边是属性编辑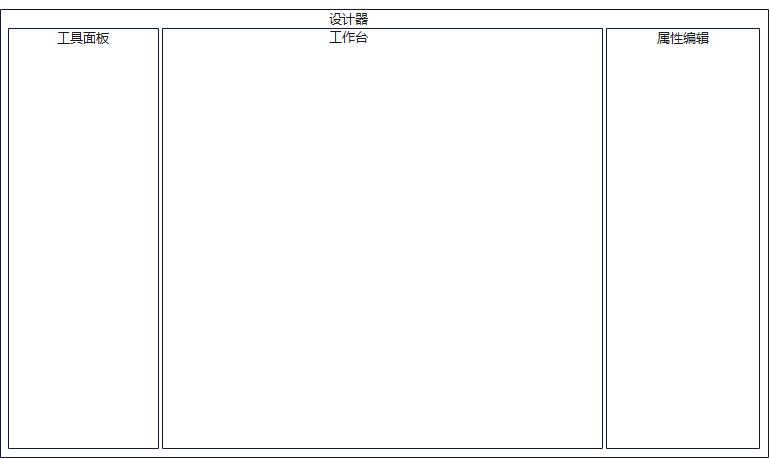
组件定义
为了给每个组件增加设计属性,所以需要对组件进行扩展。增加Resource属性。
export type IResource = {
    name?: string
    icon?: string
    schema?: ISchema
    designerProps?: {
        propsSchema?: ISchema
        defaultProps?: any
    },
    node?: TreeNode
    [key: string]: any
}

export type TdFC<P = {}> = React.FC<P> & {
    Resource?: IResource[]
}
以Input组件为例,对formiy的Input组件进行扩展
import {DesignerCore, TdFC} from "@trionesdev/form-designer-react";
import {Input as FormilyInput} from '@formily/antd-v5'
import React from "react";
import createResource = DesignerCore.createResource;


export const Input: TdFC<React.ComponentProps<typeof FormilyInput>> = FormilyInput

Input.Resource = createResource([
    {
        name: 'Input',
        icon: 'InputIcon',
        title: '输入框',
        componentName: 'Field',
        schema: {
            type: 'string',
            title: '输入框',
            'x-decorator': 'FormItem',
            'x-component': 'Input',
            required: true,
        },
        designerProps: {
            propsSchema: {
                type: 'object',
                properties: {
                    title: {
                        type: 'string',
                        title: '标题',
                        'x-decorator': 'FormItem',
                        'x-component': 'Input',
                    },
                    required: {
                        type: 'string',
                        title: '是否必填',
                        'x-decorator': 'FormItem',
                        'x-component': 'Switch',
                    },
                }
            }
        }
    },
    {
        name: 'Input.TextArea',
        icon: 'TextAreaIcon',
        title: '多行输入框',
        componentName: 'Field',
        schema: {
            type: 'string',
            title: '文本框',
            required: true,
            'x-decorator': 'FormItem',
            'x-component': 'Input.TextArea'
        },
        designerProps: {
            propsSchema: {
                type: 'object',
                properties: {
                    title: {
                        type: 'string',
                        title: '标题',
                        'x-decorator': 'FormItem',
                        'x-component': 'Input',
                    },
                }
            }
        }
    }
])
export const createResource = (resources: IResource[]): IResource[] => {
    return _.reduce(resources, (result: any, source: any) => {
        return _.concat(result, source)
    }, []).map((item: any) => _.assign(item, {
        node: new TreeNode({
            isSourceNode: true,
            componentName: item.componentName,
            schema: item.schema,
        })
    }))
}
工作台组件渲染
首先,我们确定好我们的数据结构是一个树形的,参考html的dom树。工具栏的组件,在首先加载到一个节点池里。在工作区,根节点就是Form组件,拖入设计区的组件根据id找到对应的TreeNode对象,添加到目标节点的children中,然后通过递归来渲染节点。总的来说,整个组件,都是围绕TreeNode来进行操作的。
export interface ITreeNode {

    children?: ITreeNode[]
    id?: string
    componentName?: string
    isSourceNode?: boolean
    schema?: ISchema
    operation?: Operation

    [key: string]: any
}

const TreeNodes = new Map<string, TreeNode>()

export class TreeNode {
    parent?: TreeNode
    root?: TreeNode
    children: TreeNode[] = []
    id: string
    componentName: string
    isSourceNode?: boolean
    schema?: ISchema
    operation?: Operation

    constructor(node: ITreeNode, parent?: TreeNode) {
        if (node instanceof TreeNode) {
            return node
        }
        this.id = node.id || `td_${randomstring.generate({
            length: 10,
            charset: 'alphabetic'
        })}`
        this.root = node?.root
        this.parent = node?.parent
        this.isSourceNode = node?.isSourceNode
        this.componentName = node?.componentName || 'Field'
        this.schema = node?.schema
        this.operation = node?.operation || parent?.operation

        if (parent) {
            this.root = parent?.root
            this.parent = parent
        } else {
            this.root = this
            this.parent = null
        }

        TreeNodes.set(this.id, this) //同步设置节点到TreeNodes

        if (node) {
            this.from(node)
        }
        this.makeObservable()
    }

    makeObservable() {
        define(this, {
            children: observable.shallow,
            schema: observable,
            designerProps: observable.computed,
            append: action
        })
        reaction(() => {
            return this.children
        }, () => {
            if (!this.isSourceNode) {
                this.operation.onChange(`${this.id} children changed`)
            }
        })

    }


    from(node?: ITreeNode) {
        if (!node) return

        if (node.id && node.id !== this.id) {
            TreeNodes.delete(this.id)
            TreeNodes.set(node.id, this)
            this.id = node.id
        }
        if (node.componentName) {
            this.componentName = node.componentName
        }
        this.schema = node.schema ?? {}

        if (node.children) {
            this.children =
                node.children?.map?.((node) => {
                    node.operation = this.operation
                    return new TreeNode(node,this)
                }) || []
        }
    }

    get designerProps() {
        return GlobalStore.getDesignerResourceByNode(this)?.designerProps?.propsSchema || {}
    }

    get title() {
        return GlobalStore.getDesignerResourceByNode(this)?.title
    }

    get displayName() {
        return _.get(this.schema, 'title', GlobalStore.getDesignerResourceByNode(this)?.title)
    }

    get icon() {
        return GlobalStore.getDesignerResourceByNode(this)?.icon
    }

    get droppable() {
        return GlobalStore.getDesignerResourceByNode(this)?.droppable || false
    }

    findNodeById(id: string) {
        return TreeNodes.get(id)
    }

    get index() {
        if (this.parent === this || !this.parent) return 0
        return this.parent.children.indexOf(this)
    }

    get next() {
        if (this.parent === this || !this.parent) return
        return this.parent.children[this.index + 1]
    }

    /**
     * 在当前节点内添加节点
     * @param nodes
     */
    append(...nodes: TreeNode[]) {
        const droppableNode = this.droppableNode() //找到最近的可以拖入的节点
        if (droppableNode) {
            const appendNodes = this.restNodes(nodes, droppableNode);
            droppableNode.children = _.concat(droppableNode.children, appendNodes)
            this.operation.setSelectionNode(appendNodes[0]) //设置新增节点为选中状态
        }
    }

    /**
     * 插入当前节点之前
     * @param nodes
     */
    insertBefore(...nodes: TreeNode[]) {
        const insertNodes = _.filter(nodes, (node: TreeNode) => {
            return node.id !== this.id
        })
        if (_.isEmpty(insertNodes)) {
            return
        }
        const droppableNode = this.droppableNode() //找到最近的可以拖入的节点
        if (droppableNode) {
            const dropNodes = this.restNodes(insertNodes, droppableNode);
            const index = _.findIndex(droppableNode.children, (node: TreeNode) => {
                return node.id === this.id
            })
            const dropNodesIds = _.map(dropNodes, (node: TreeNode) => {
                return node.id
            })
            const beforeNodes = _.filter(droppableNode.children.slice(0, index), (node: TreeNode) => {
                return !_.includes(dropNodesIds, node.id)
            });
            const afterNodes = _.filter(droppableNode.children.slice(index), (node: TreeNode) => {
                return !_.includes(dropNodesIds, node.id)
            });
            droppableNode.children = _.concat(beforeNodes, dropNodes, afterNodes)
            this.operation.setSelectionNode(dropNodes[0])
        }
    }

    /**
     * 插入当前节点后面
     * @param nodes
     */
    insertAfter(...nodes: TreeNode[]) {
        const insertNodes = _.filter(nodes, (node: TreeNode) => {
            return node.id !== this.id
        })
        if (_.isEmpty(insertNodes)) {
            return
        }
        const droppableNode = this.droppableNode() //找到最近的可以拖入的节点
        if (droppableNode) {
            const dropNodes = this.restNodes(insertNodes, droppableNode);
            const index = _.findIndex(droppableNode.children, (node: TreeNode) => {
                return node.id === this.id
            })
            const dropNodesIds = _.map(dropNodes, (node: TreeNode) => {
                return node.id
            })
            const beforeNodes = _.filter(droppableNode.children.slice(0, index + 1), (node: TreeNode) => {
                return !_.includes(dropNodesIds, node.id)
            });
            const afterNodes = _.filter(droppableNode.children.slice(index + 1), (node: TreeNode) => {
                return !_.includes(dropNodesIds, node.id)
            });
            droppableNode.children = _.concat(beforeNodes, dropNodes, afterNodes)
            this.operation.setSelectionNode(dropNodes[0])
        }
    }

    remove() {
        const index = this.parent.children.indexOf(this)

        this.parent.children = this.parent.children.filter((node) => {
            return node.id !== this.id
        })
        if (_.isEmpty(this.parent.children)) {
            this.operation.selectionNode = this.parent
        } else {
            if (index > 0) {
                this.operation.selectionNode = this.parent.children[index - 1]
            } else {
                this.operation.selectionNode = this.parent.children[index]
            }
        }
        TreeNodes.delete(this.id)
    }

    /**
     * 最近的可以拖入的节点
     */
    droppableNode() {
        if (this.isSourceNode) {
            return
        } else {
            if (this.droppable) {
                return this;
            } else {
                return this.parent?.droppableNode()
            }
        }
    }

    private restNodes(nodes: TreeNode[], parentNode: TreeNode): TreeNode[] {
        return nodes.map(node => {
            if (node.isSourceNode) {
                return node.clone(parentNode);
            } else {
                if (!node.parent) {
                    node.parent = parentNode
                }
                return node
            }

        })
    }

    clone(parent?: TreeNode): TreeNode {
        const newNode = new TreeNode({
            componentName: this.componentName,
            schema: _.cloneDeep(this.schema), //一定要深拷贝,否则数据会干扰,都是直接用的source组件的数据
            isSourceNode: false,
            operation: parent.operation
        },parent)
        return newNode
    }

    get layout() {
        if (this == this.root) {
            return 'vertical'
        }
        //TODO 根据组件类型获取布局
        return 'vertical'
    }
}
属性编辑
属性编辑好,要自动刷新工作台组件的的渲染,这里主要是依赖 @formily/reactive 实现的,所以,@formily/reactive 在整个项目中是至关重要的,数据的同步都依赖它。这里我们为了摆脱对组件库的依赖,属性编辑栏不依赖任何组件,而是使用方,自己设置需要哪些组件来满足业务。
type SettingsPanelProps = {
    className?: string,
    components?: Record<string, JSXComponent>
    /**
     * form 组件属性
     */
    formProps?: Omit<any, 'form'>
}

const SchemaField = createSchemaField({
    components: {},
})

export const SettingsPanel: React.FC<SettingsPanelProps> = observer(({
                                                                         className,
                                                                         components,
                                                                         formProps
                                                                     }) => {
    const operation = useOperation()
    const {selectionNode} = operation

    const form = useMemo(() => {
        return createForm({
            initialValues: selectionNode?.designerProps?.defaultProps,
            values: selectionNode?.schema,
            effects(form) {

            }
        })
    }, [selectionNode, selectionNode?.id])

    /**
     * 如果有Form组件,则使用Form组件包裹,如果没有则使用FormProvider包裹
     * @param children
     */
    const formRender = (children: React.ReactNode) => {
        const formComp = components['Form']
        if (formComp) {
            return React.createElement(formComp, {form, ...formProps}, children)
        } else {
            return React.createElement(FormProvider, {form}, children)
        }
    }

    return <SettingsPanelStyled className={className}>
        <div className={`properties-header`}>
            {selectionNode && <>
                <IconWidget icon={GlobalStore.getIcon(selectionNode.icon)}/>
                <span>{selectionNode.title}</span>
            </>}
        </div>
        <div className={`properties-body`}>
            {formRender(<SchemaField components={components} schema={selectionNode?.designerProps}/>)}
        </div>
    </SettingsPanelStyled>
})
以上就是整个表单设计器最核心的部分了,其他的细节处理,可以自己查看源码。
设计器使用
由于需要摆脱组件库的限制,所以,具体的业务组件,都是在使用处进行封装的
为了避免名称冲突,建议属性面板进行二次封装
AntdSettingsPanel
import React from "react";
import {SettingsPanel} from "@trionesdev/form-designer-react";
import {Form, FormItem, Input, Select, Switch} from "@formily/antd-v5";

export const AntdSettingsPanel = () => {
    return <SettingsPanel components={{Form, FormItem, Input, Select,Switch}} formProps={{
        layout: "vertical"
    }}/>
}
使用
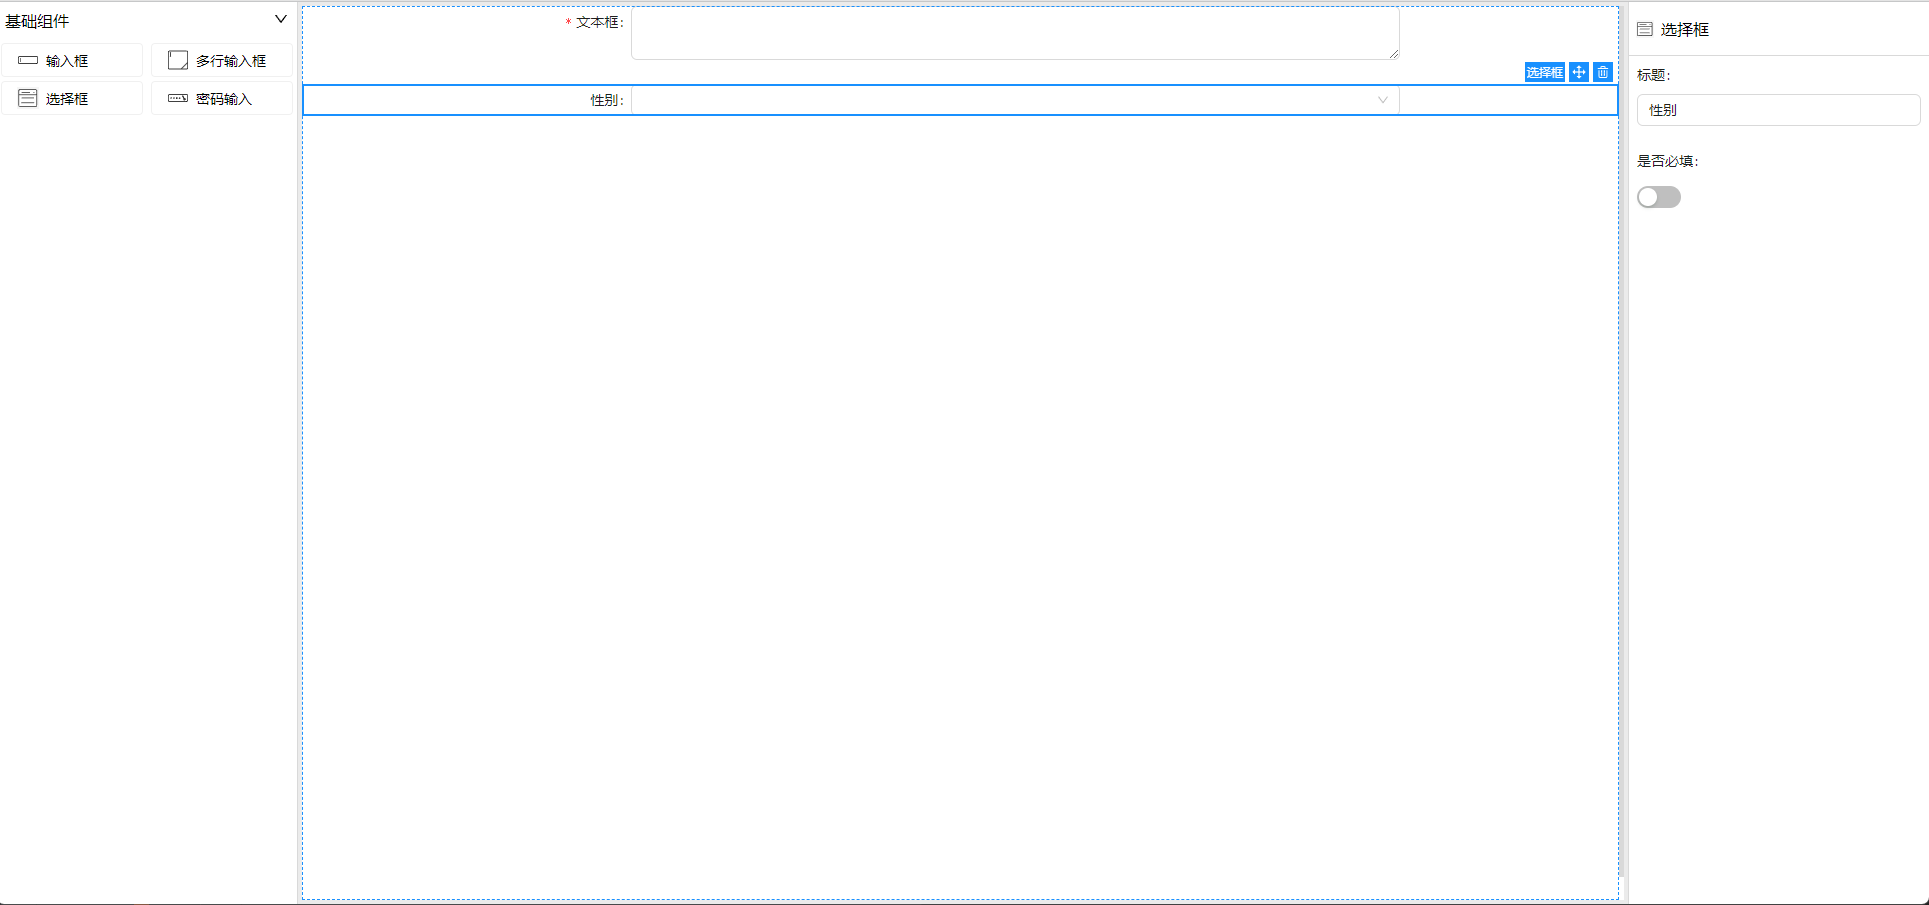
function App() {

    GlobalStore.registerIcons(icons)

    const handleOnChange = (value: any) => {
        console.log("[TreeInfo]value", value)
    }

    const value = {
        "x-id": "td_tXAABwaZAE",
        "type": "object",
        "x-component-name": "Form",
        "properties": {
            "td_rszikvOzVh": {
                "type": "string",
                "title": "文本框",
                "required": true,
                "x-decorator": "FormItem",
                "x-component": "Input.TextArea",
                "x-id": "td_rszikvOzVh",
                "x-index": 0,
                "x-component-name": "Field",
            },
            "td_AaMFjiFfps": {
                "title": "性别",
                "x-decorator": "FormItem",
                "x-component": "Select",
                "x-id": "td_AaMFjiFfps",
                "x-index": 1,
                "x-component-name": "Field",
            }
        }
    }

    return (
        <div className="App">
            <FormDesigner value={value} onChange={handleOnChange}>
                <StudioPanel>
                    <CompositePanel style={{width: 300}}>
                        <ResourceWidget title={`基础组件`} sources={[Input, Select, Password]}/>
                    </CompositePanel>
                    <WorkspacePanel>
                        <ViewportPanel>
                            <ViewPanel >
                                <ComponentsWidget components={{Form, Input, Select, Password}}/>
                            </ViewPanel>
                        </ViewportPanel>
                    </WorkspacePanel>
                    <AntdSettingsPanel/>
                </StudioPanel>
            </FormDesigner>
        </div>
    );
}

export default App;
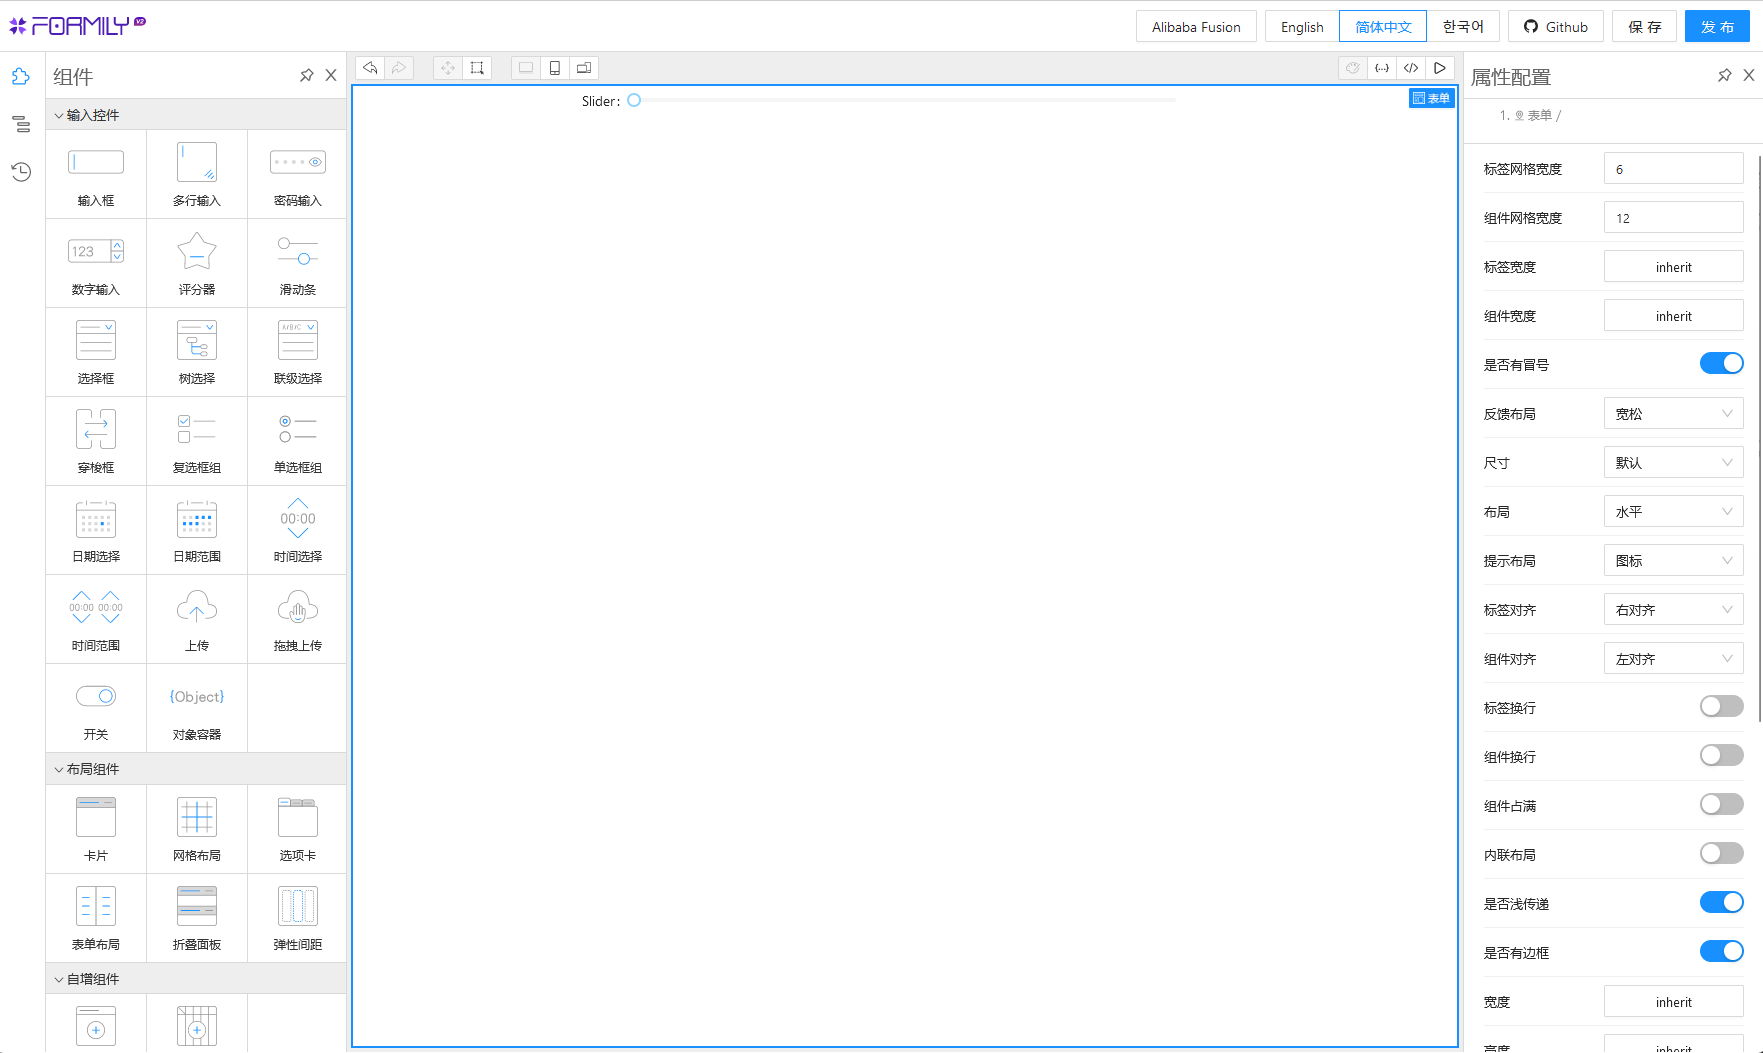
运行效果
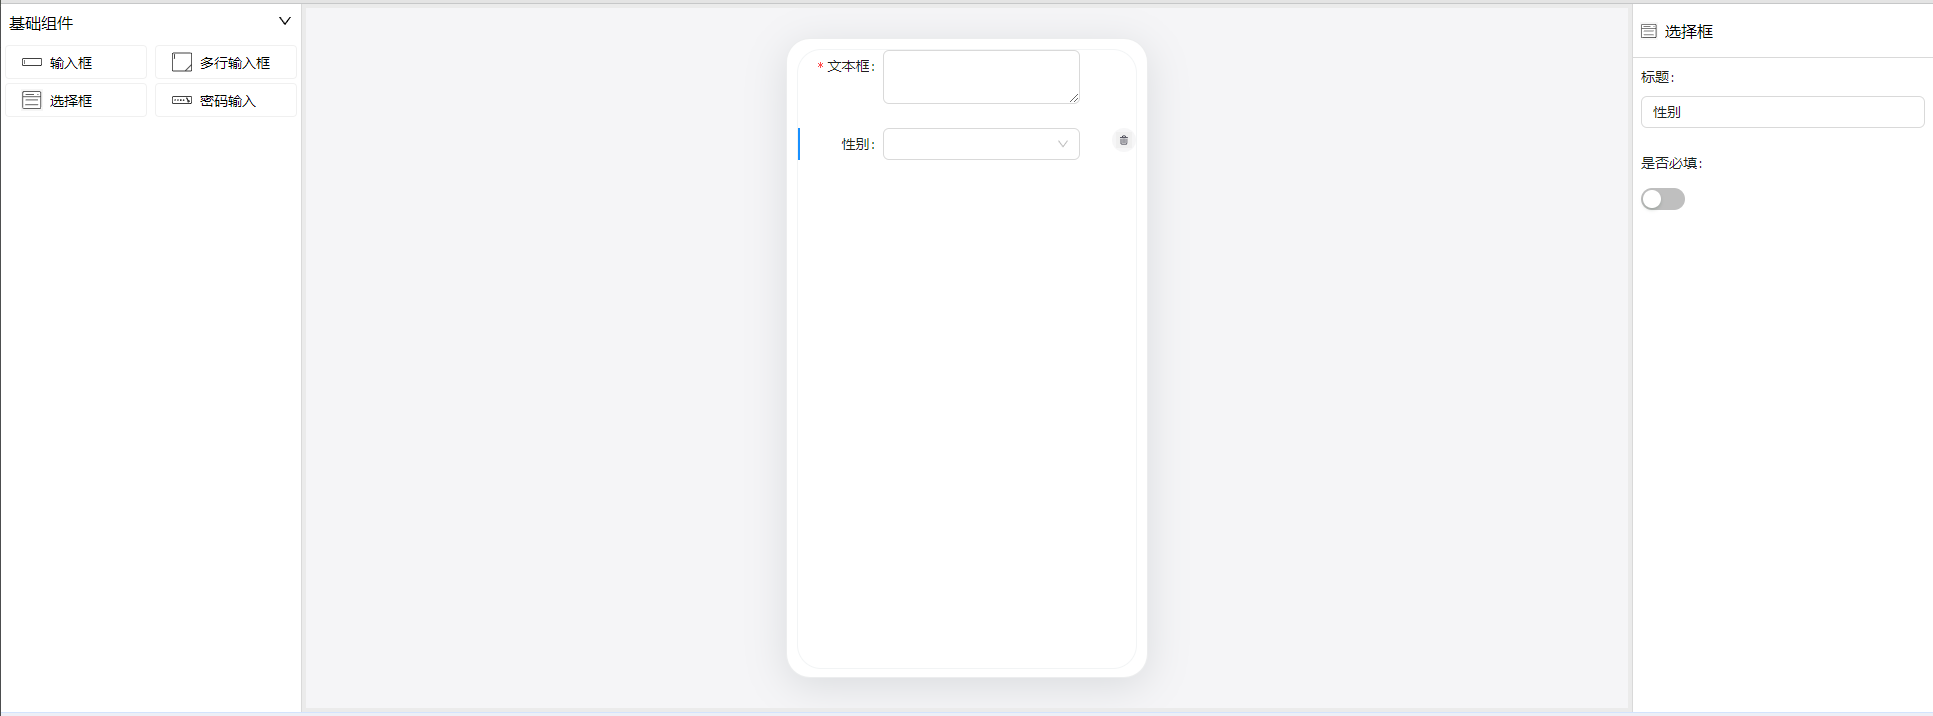
以上就是react版本的 triones-form-designer 后续会推出vue版本。等我们在项目中使用,没什么问题了会推送到npmjs仓库。
注意: 基于 formily/reactive 订阅对象的变化 需要用 observer , 并不能被useEffect获取
github地址:https://github.com/trionesdev/triones-form-designer
演示地址:https://trionesdev.github.io/triones-form-designer/