pyside6简介
Qt for Python是Qt官方提供的一系列支持Python的组件集合,它将增强您的Python应用程序。Qt API已经世界闻名,但是有更多的理由让您考虑使用Qt for Python。Qt for Python 已正式发布可用。
前提条件
1)需要安装Python3.7+
2)官网建议在虚拟环境中安装pyside6进行使用
3)安装Qt Designer,以便可以进行UI界面设计
IDE集成
PyCharm
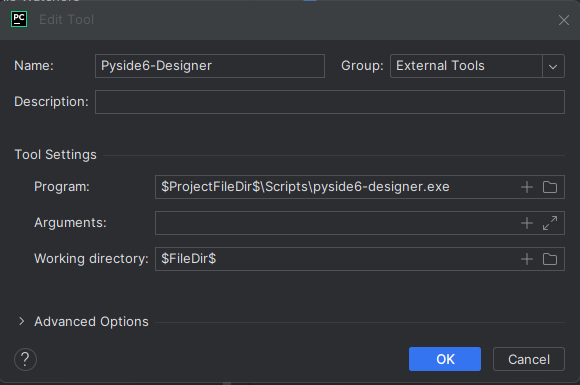
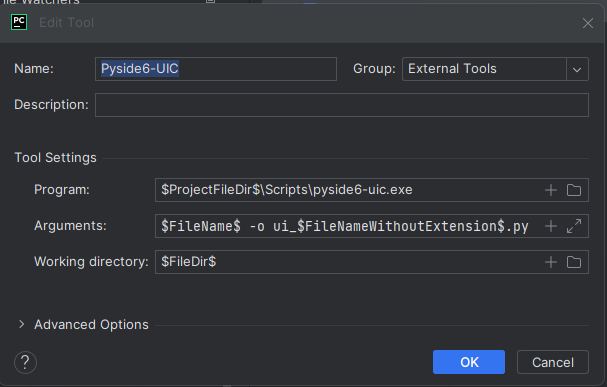
File > Settings > Tools > External Tools,配置Qt Designer,pyside6-uic。
配置Qt Designer是为了可以在PyCharm用Qt Designer直接打开.ui设计文件进行相关的设计工作;
配置pyside6-uic是为了将.ui设计文件转换为python代码。
使用方式
创建一个python项目,然后安装pyside6依赖库。
安装pyside6
python3 -m pip install pyside6集成Qt Widgets开发
方式一:直接编写代码
import sys
import random
from PySide6 import QtCore, QtWidgets, QtGui

class MyWidget(QtWidgets.QWidget):
    def __init__(self):
        super().__init__()

        self.hello = ["Hallo Welt", "Hei maailma", "Hola Mundo", "Привет мир"]

        self.button = QtWidgets.QPushButton("Click me!")
        self.text = QtWidgets.QLabel("Hello World", alignment=QtCore.Qt.AlignCenter)

        self.layout = QtWidgets.QVBoxLayout(self)
        self.layout.addWidget(self.text)
        self.layout.addWidget(self.button)

        self.button.clicked.connect(self.magic)

    @QtCore.Slot()
    def magic(self):
        self.text.setText(random.choice(self.hello))

if __name__ == "__main__":
    app = QtWidgets.QApplication([])

    widget = MyWidget()
    widget.resize(800, 600)
    widget.show()

    sys.exit(app.exec())
以上代码直接运行,会直接打开一个窗体,上面的代码展示了py代码如何与页面组件进行交互,其中有在页面上动态展示某个值;接收页面按钮的单击事件。
方式二:集成qt中的.ui界面设计文件
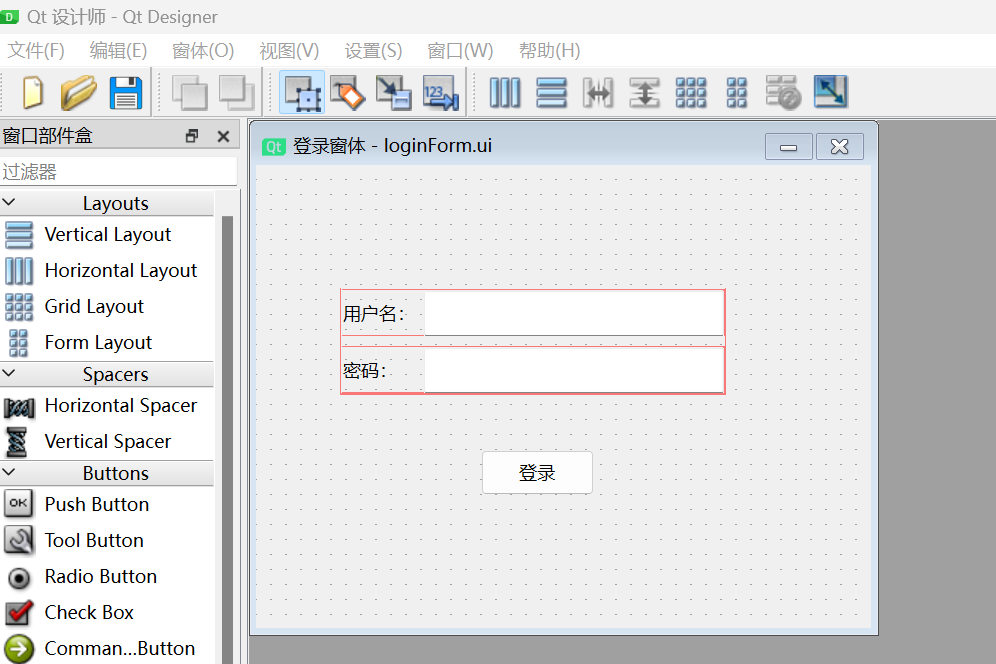
1)qt creator中创建一个界面设计文件,可以规划一个登录界面。
2)将ui文件转换为python文件
使用工具pyside6-uic.exe将.ui文件转换为对应的python文件
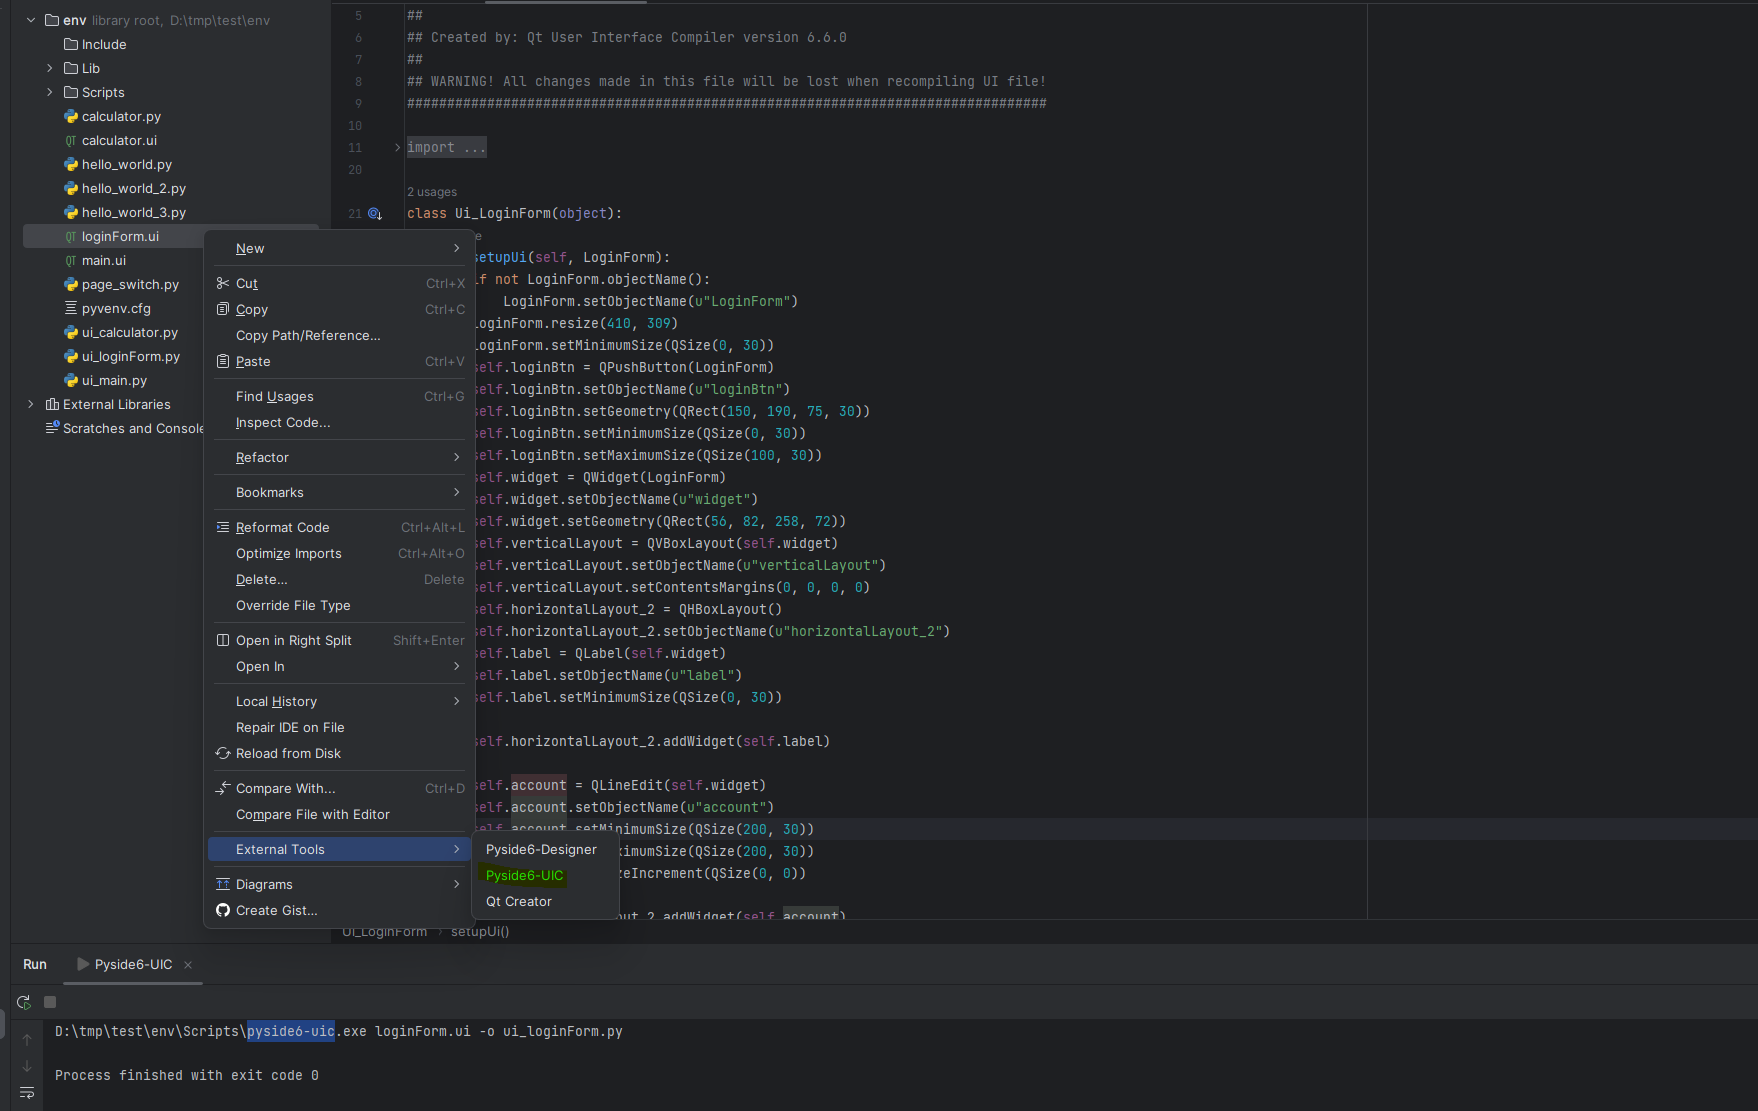
也就是使用上面配置的工具直接进行转换,可以看到,在控制台会输出对应的转换命令,转换之后的python文件为ui_loginForm.py,对应代码如下:
# -*- coding: utf-8 -*-

################################################################################
## Form generated from reading UI file 'loginForm.ui'
##
## Created by: Qt User Interface Compiler version 6.6.0
##
## WARNING! All changes made in this file will be lost when recompiling UI file!
################################################################################

from PySide6.QtCore import (QCoreApplication, QDate, QDateTime, QLocale,
    QMetaObject, QObject, QPoint, QRect,
    QSize, QTime, QUrl, Qt)
from PySide6.QtGui import (QBrush, QColor, QConicalGradient, QCursor,
    QFont, QFontDatabase, QGradient, QIcon,
    QImage, QKeySequence, QLinearGradient, QPainter,
    QPalette, QPixmap, QRadialGradient, QTransform)
from PySide6.QtWidgets import (QApplication, QHBoxLayout, QLabel, QLineEdit,
    QPushButton, QSizePolicy, QVBoxLayout, QWidget)

class Ui_LoginForm(object):
    def setupUi(self, LoginForm):
        if not LoginForm.objectName():
            LoginForm.setObjectName(u"LoginForm")
        LoginForm.resize(410, 309)
        LoginForm.setMinimumSize(QSize(0, 30))
        self.loginBtn = QPushButton(LoginForm)
        self.loginBtn.setObjectName(u"loginBtn")
        self.loginBtn.setGeometry(QRect(150, 190, 75, 30))
        self.loginBtn.setMinimumSize(QSize(0, 30))
        self.loginBtn.setMaximumSize(QSize(100, 30))
        self.widget = QWidget(LoginForm)
        self.widget.setObjectName(u"widget")
        self.widget.setGeometry(QRect(56, 82, 258, 72))
        self.verticalLayout = QVBoxLayout(self.widget)
        self.verticalLayout.setObjectName(u"verticalLayout")
        self.verticalLayout.setContentsMargins(0, 0, 0, 0)
        self.horizontalLayout_2 = QHBoxLayout()
        self.horizontalLayout_2.setObjectName(u"horizontalLayout_2")
        self.label = QLabel(self.widget)
        self.label.setObjectName(u"label")
        self.label.setMinimumSize(QSize(0, 30))

        self.horizontalLayout_2.addWidget(self.label)

        self.account = QLineEdit(self.widget)
        self.account.setObjectName(u"account")
        self.account.setMinimumSize(QSize(200, 30))
        self.account.setMaximumSize(QSize(200, 30))
        self.account.setSizeIncrement(QSize(0, 0))

        self.horizontalLayout_2.addWidget(self.account)


        self.verticalLayout.addLayout(self.horizontalLayout_2)

        self.horizontalLayout = QHBoxLayout()
        self.horizontalLayout.setObjectName(u"horizontalLayout")
        self.label_2 = QLabel(self.widget)
        self.label_2.setObjectName(u"label_2")

        self.horizontalLayout.addWidget(self.label_2)

        self.password = QLineEdit(self.widget)
        self.password.setObjectName(u"password")
        self.password.setMinimumSize(QSize(200, 30))
        self.password.setMaximumSize(QSize(200, 30))

        self.horizontalLayout.addWidget(self.password)


        self.verticalLayout.addLayout(self.horizontalLayout)


        self.retranslateUi(LoginForm)

        QMetaObject.connectSlotsByName(LoginForm)
    # setupUi

    def retranslateUi(self, LoginForm):
        LoginForm.setWindowTitle(QCoreApplication.translate("LoginForm", u"\u767b\u5f55\u7a97\u4f53", u"\u767b\u5f55\u6846"))
        self.loginBtn.setText(QCoreApplication.translate("LoginForm", u"\u767b\u5f55", None))
        self.label.setText(QCoreApplication.translate("LoginForm", u"\u7528\u6237\u540d\uff1a", None))
        self.label_2.setText(QCoreApplication.translate("LoginForm", u"\u5bc6\u7801\uff1a", None))
    # retranslateUi
其实只要我们去理解对应的API,你也可以直接写出来这样的界面。
3)配置运行
import sys

from PySide6.QtWidgets import QApplication, QWidget, QStackedWidget
from PySide6.QtCore import QFile, QIODeviceBase
from PySide6.QtUiTools import QUiLoader
from ui_loginForm import Ui_LoginForm

class MyWidget(QWidget, Ui_LoginForm):
    def __init__(self):
        super().__init__()
        self.setupUi(self)

        self.loginBtn.clicked.connect(self.helloWorld)

    def helloWorld(self):
        print("helloWorld")
        account = self.account.text()
        password = self.password.text()
        print("account: ", account)
        print("password: ", password)

if __name__ == "__main__":
    app = QApplication()
    myWidget = MyWidget()
    myWidget.resize(520, 400)
    myWidget.show()

    sys.exit(app.exec())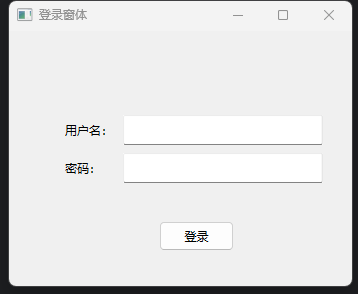
集成Qt Quick开发
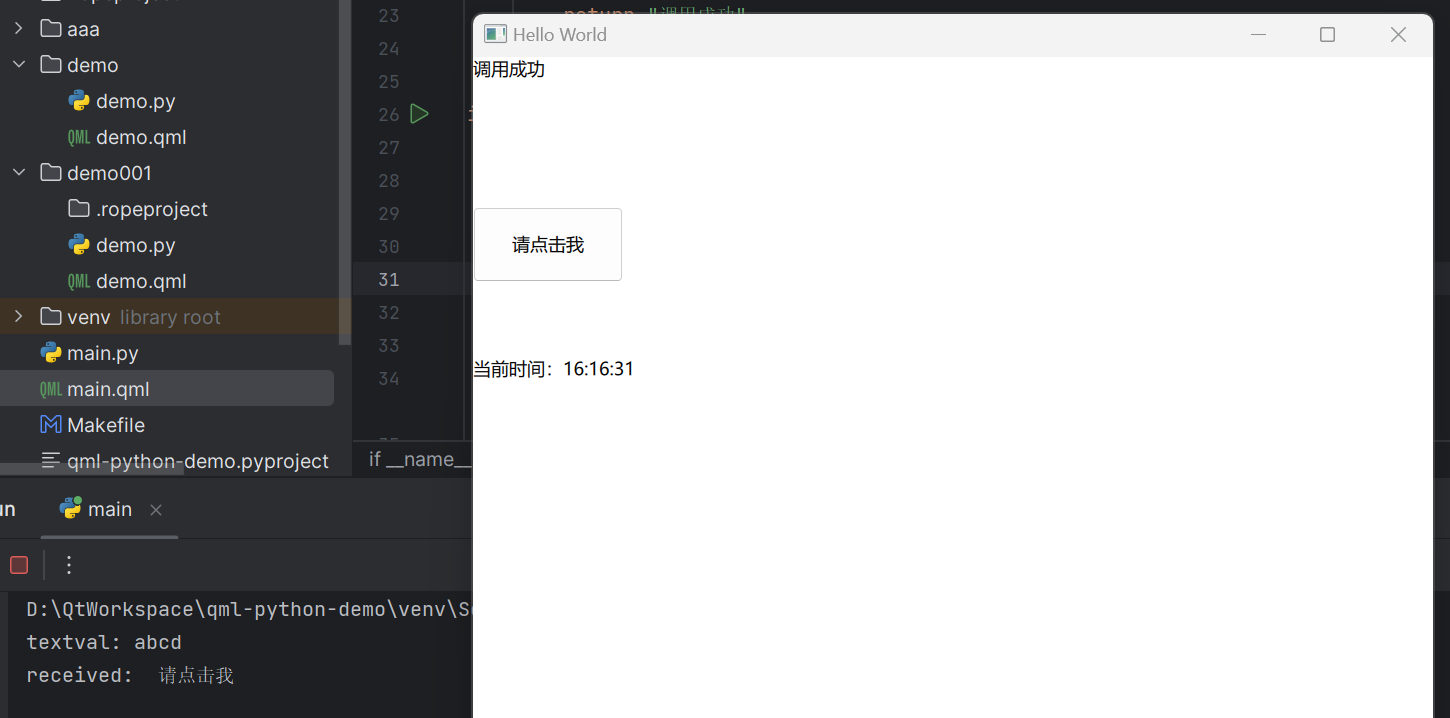
下面以一个页面上的计时器以及可以响应页面上按钮事件来做一个使用演示。
1)界面设计文件:main.qml
import QtQuick
import QtQuick.Window
import QtQuick.Controls

import com.justin.demo 1.0

Window {
    width: 640
    height: 580
    visible: true
    title: qsTr("Hello World")
    property string textval: "abcd"
    property alias textShowText: textShow.text

    Bridge {
        id: bridge
    }

    Label {
        id: showLabel
        text: "abc"
    }

    Button {
        id: italic
        y: 100
        width: 100
        height: 50
        text: "请点击我"
        onClicked: {
            showLabel.text = bridge.do_when_click(italic.text)
        }
    }

    Rectangle {
        y: 200
        width: 100
        height: 50

        Text {
            id: textShow
        }
    }
}这里面的Bridge组件其实就是为了映射python文件中定义的Bridge类,相当于是qml与python文件的一个沟通桥梁。
2)python文件:main.py
# This Python file uses the following encoding: utf-8
import sys
from pathlib import Path

from PySide6.QtCore import QObject, Slot, QTimer
from PySide6.QtGui import QGuiApplication
from PySide6.QtQml import QQmlApplicationEngine, QmlElement
from time import strftime, localtime

# To be used on the @QmlElement decorator
# (QML_IMPORT_MINOR_VERSION is optional)
QML_IMPORT_NAME = "com.justin.demo"
QML_IMPORT_MAJOR_VERSION = 1


@QmlElement
class Bridge(QObject):

    # 回调方法
    @Slot(str, result=str)
    def do_when_click(self, s):
        print("received: ", s)
        return "调用成功"


if __name__ == "__main__":
    app = QGuiApplication(sys.argv)
    engine = QQmlApplicationEngine()
    qml_file = Path(__file__).resolve().parent / "main.qml"
    engine.load(qml_file)
    if not engine.rootObjects():
        sys.exit(-1)


    def update_time():
        curr_time = strftime("%H:%M:%S", localtime())
        # 尝试设置值到页面
        engine.rootObjects()[0].setProperty('textShowText', "当前时间:" + curr_time)


    timer = QTimer()
    timer.setInterval(100)
    timer.timeout.connect(update_time)
    timer.start()

    update_time()

    # 测试从页面获取值
    textval = engine.rootObjects()[0].property("textval")
    print("textval: " + textval)

    sys.exit(app.exec())
3)运行效果
官网地址
https://doc.qt.io/qtforpython-6/quickstart.html
总结
我也是因为最近做项目,才第一次尝试使用,上面也只是一些简单的使用方式,下面就是要花时间多学习学习相关的API了。