组件(Component)
react中component是基本的单元, 所有的功能、代码都是封装在组件里面,包含html、js、css,通过React.Component 或者React.PureComponent等创建。
顺便延伸一下前端发展 component的概念(可能不准确), 印象中最早是ng里面的directive,再试polymer,web-component 再到vue react angular中的component就已经随处可见了。
state
react数据变化的基本单元之一,在当前组件使用,state变化,会触发render函数,重新渲染ui。
注意:
只能通过setState({state: ''}) 修改state,不能直接this.state = 'xxx'赋值;
setState可能是异步的,如果想立即拿到setState后的值, setState(obj, func) 第二个参数是一个函数回调,可以在回调函数中获取最新的this.state;
多次setState会被合并,触发一次render,在版本16.8之前是通过事务触发多个setState的合并更新,最新版是使用fiber;这块等后续有时间增加专门的源码分析补充细节原理吧。
class App extends React.Component {
  constructor() {
    super();
    this.state = {name: 'react'}
  }
  render() {
    const {name} = this.state;
    return (
      <div>
        hello, {name}
      </div>
    )
  }
}
props
和state组件类似,但是当前组件的props是不可变的,通过props完成组件的数据传递,
props类型可以是func、string、number等各种类型,通过PropTypes 控制校验类型,类型不匹配会跑出warning,注意:早期版本PropTypes是在react包中的,现在已经独立出来,需要单独安装引入'prop-types'。
defaultProps设置默认值,和propTypes设置的类型一致
如果想改变props,只能通过调用方修改。
按照经验,需要props频繁修改的一般都是在调用层都会抽象成state,通过setState 触发shouldComponentUpdate ---->render--->触发componentWillReceiveProps(新版本已经废弃) --->触发子组件render.
例子:
import PropTypes from 'PropTypes';
class App extends React.Component {
  render() {
    const {name} = this.props;
    return (
      <div>
        hello, {name}
      </div>
    )
  }
}
App.propTypes = {
  name: PropTypes.string
};
App.defaultProps = {
  name: 'test'
};

// 使用App
import App from './App';
class Container extends React.Component {
  contructor() {
    this.state = {name: 'react'};
  }
  render() {
    const {name} = this.state;
    return (
      <div><App name={name}/></div>
    )
  }
}
jsx(javascript and xml)
jsx其实就是一个javascript的语法扩展,类似模板语言,但是包括javascript全部功能,react开发并不强制要求使用jsx,但是还是使用jsx开发react,更合理,效率更高。
我们来看一下jsx的例子:
const name = 'jsx first';
const url = ''
const func = (name) => { 'hello, ' + name};
const element = <div>Hello, {func(name)}, <img src={url}/></div>;
jsx 支持函数调用、变量命名,属性传递等。
这里要顺便提一下, 通过babel 最终会将jsx转成js
const element = (
  <h1 className="greeting">
    Hello, world!
  </h1>
);
// 转成
const element = React.createElement(
  'h1',
  {className: 'greeting'},
  'Hello, world!'
);
事件
react事件是根据w3c标准,自定义了事件机制,所有的事件都绑定在document上,统一分发,使用者不用关心浏览器兼容问题。
使用react事件主要需要关注几点:
- event是事件合成事件概念,包含了浏w3c标准的事件功能,具体可以参考SyntheticEvent.js
- js的class方法不会默认绑定this,需要手动绑定
- 命名使用驼峰的规则
事件调用有3中方式(主要还是为了解决this问题)
方法一:在constructor中手动绑定this, 需要手动绑定,没什么别的问题,就是代码比较啰嗦
class App extends React.Component {
  constructor(props) {
    super(props);
    this.state = {isToggleOn: true};
    // 为了在回调中使用 `this`,这个绑定是必不可少的
    this.handleClick = this.handleClick.bind(this);
  }
  handleClick() {
    this.setState(state => ({
      isToggleOn: !state.isToggleOn
    }));
  }
  render() {
    return (
      <button onClick={this.handleClick}>
        {this.state.isToggleOn ? 'ON' : 'OFF'}
      </button>
    );
  }
}
方法二:虽然不需要在手动bind this了,但是每次调用render都会创建不同的回调函数,如果该回调函数作为 prop 传入子组件时,这些组件可能会进行额外的重新渲染。不推荐使用这种方式
class App extends React.Component {
  handleClick(e) {
    console.log(this, e);
  }
  render() {
    // 此语法确保 `handleClick` 内的 `this` 已被绑定。
    return (
      <button onClick={(e) => this.handleClick(e)}>
        Click me
      </button>
    );
  }
}
方法三:react文档的术语是使用class fields绑定this,其实就是在具体方法使用箭头函数。推荐使用这种方式
class App extends React.Component {
  // 此语法确保 `handleClick` 内的 `this` 已被绑定。
  handleClick = () => {
    console.log('this is:', this);
  }
  render() {
    return (
      <button onClick={this.handleClick}>
        Click me
      </button>
    );
  }
}
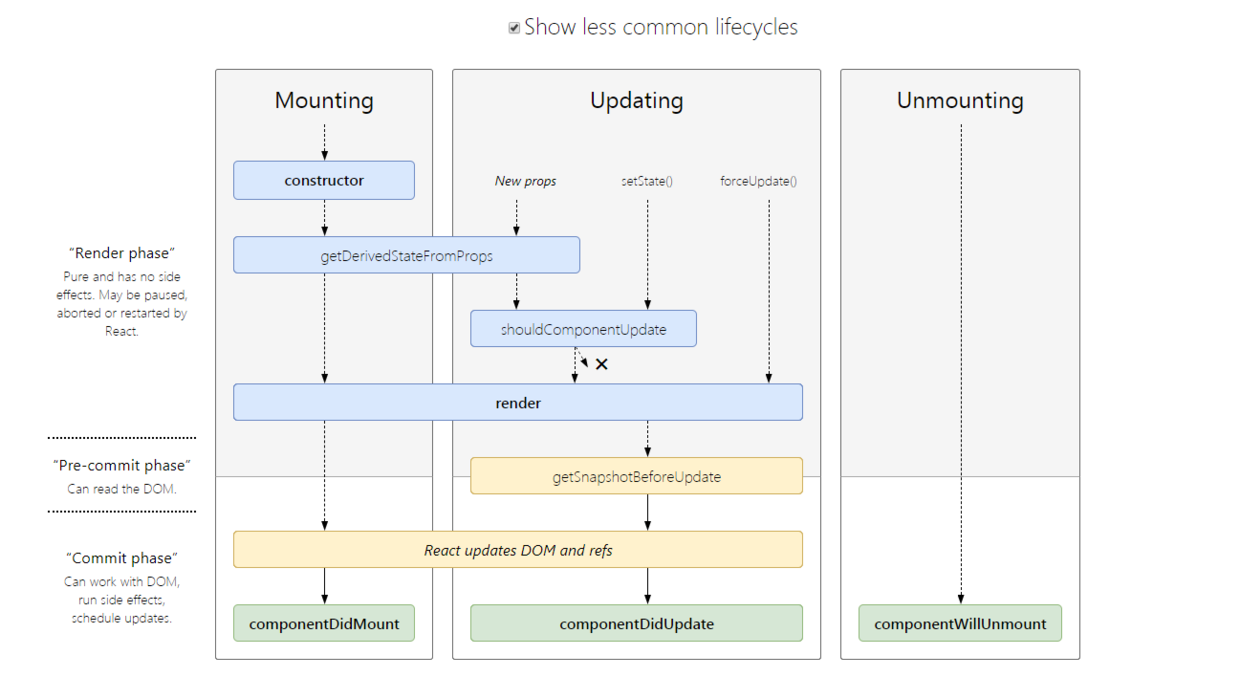
生命周期
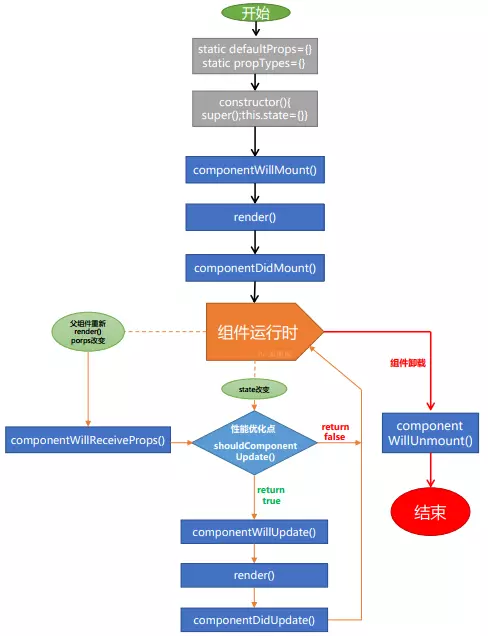
上图很好的描述了react生命周期执行的顺序,和state改变后执行的过程。
重点关注的几个:
- componentDidMount, 一般后端数据请求在此处触发
- render,state/props变化以后触发页面渲染
- shouldComponentUpdate,return false的话,则不继续执行,可以在这里进行性能优化,减少不必要的渲染
- componentWillUnmount,在组件卸载的时候手动做一些处理,比如remove一些手动绑定的事件,clearInterval等
16.3之后的生命周期,废弃三个生命周期函数
componentWillMountcomponentWillReceivePropscomponentWillUpdate
增加两个新的生命周期
- static getDerivedStateFromProps
- getSnapshotBeforeUpdate